Receiptor AI makes it easy to automatically export your cleaned and categorized receipt data directly into Xero or QuickBooks Online, eliminating manual uploads.
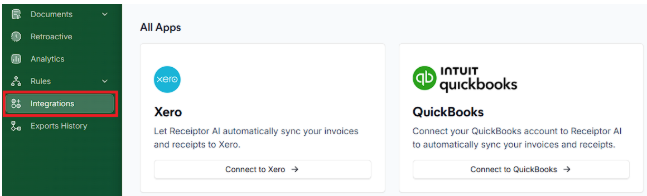
Go to ‘Integrations’
Click ‘Connect’ next to Xero or QuickBooks Online (QBO)
You’ll be redirected to log in and authorize Receiptor AI to access your account
Once authorized, you’ll be redirected back to Receiptor AI with a confirmation message. Make sure you have all the correct settings for your integration. Feel free to test it manually first.
Go to ‘Rules’ > ‘All Rules’ > ‘Create Rule’
Follow the steps on how to create automations
Trigger: select ‘When document is created’
Conditions: choose None (leave blank), or you can also add conditions if necessary, for example:
Payment status: Paid vs. Unpaid
Payment method: specific card/wallet
Merchant: Uber, AWS, Amazon, etc.
Action: select ‘Send to Integration’ → QuickBooks Online or Xero
Name and Save the Rule
Q: Can I export to both Xero and QBO at the same time?
A: Yes. In a single Rule, you can add multiple Actions: set one Action to Export → QuickBooks Online, and add another Action to Export → Xero. When the Rule triggers, Receiptor AI will perform both exports.
Q: Can I review receipts before they auto-export?
A: If you want to review each document manually first, leave auto-export off and use manual exports instead. You can see all the documents that haven’t been exported yet in the tab ‘To Export’ in the Documents section.
Q: Can I auto-export only certain documents?
A: Yes. When creating the auto-export rule, you can set conditions on the document (such as merchant name, amount, date, payment method, etc.) to export only specific records.
Q: Will the receipt PDF be attached in Xero/QBO?
A: Yes. Receiptor includes the original receipt PDF as an attachment with each export entry.
Talk with us via the live chat in the bottom-right corner of your dashboard, or email [email protected].
